Valley Hip & Ridge

Understanding Critical Roof Transition Points

Roofing 101: Valley, Hip & Ridge

Valleys, hips, and ridges represent some of the most vulnerable areas of any roofing system, requiring specialized knowledge and materials for proper protection. These transition points experience concentrated water flow, wind exposure, and structural stress that standard roofing applications cannot adequately address. Understanding the proper installation methods for these critical areas helps you evaluate roofing proposals and ensure your roof receives appropriate protection at these high-risk junctions.

Protecting Your Roof's Most Prominent Joints

Hip & Ridge Applications:
Specialized Capping Solutions

Terminology Essentials

A roof "hip" refers to the outward diagonal joint created where two roof slopes meet, while a "ridge" describes the uppermost peak formed by two opposing roof slopes. These prominent lines require specialized protection that differs from standard roof covering materials.

Evolution of Hip & Ridge Materials

When 3-tab shingles dominated the market, contractors commonly cut standard shingles into three pieces for hip and ridge capping. Today's premium laminate and designer shingles require specifically engineered capping products. While matching 3-tab shingles remain acceptable for some applications, manufacturer warranties often recommend specialty cap shingles designed to complement their premium roofing systems.

Advanced Protection Options

Modern hip and ridge products have evolved beyond traditional single-layer designs to include double-layered and pre-folded profiles that enhance both performance and aesthetic appeal. These specialized products provide superior weather protection while creating distinctive shadow lines that emphasize architectural features.

Specialized Protection for Vulnerable Drainage Channels

Valley Construction: High-Volume Water Management

Valleys—the channels formed where two roof slopes meet—channel substantial water volume during rainfall and represent particularly vulnerable points for potential leakage. Their lower slope combined with concentrated water flow requires specialized installation techniques beyond standard roofing applications.

Two Fundamental Approaches

Valley construction falls into two primary categories: open and closed styles. Each approach offers distinct advantages and limitations that should be considered based on your roof design, budget constraints, and performance expectations.

Happy Customers
0 k+

Maximum Protection for Critical Water Channels

Open Valley Construction: Superior Longevity Solution

Proper Installation Sequence

A proper open valley begins with a 3-foot wide ice and water shield applied directly to the center of the valley. A specially shaped metal flashing (either "V" or "W" profile) is then installed over this waterproof membrane. For maximum protection, a second layer of ice and water shield is split lengthwise and applied to sandwich the metal on both sides. Shingles are then precisely cut along the guide created by this second membrane layer, leaving the central metal channel exposed to direct water flow.

Metal Profile Options

Two common metal valley designs include the simple "V" profile (with a single bend matching the valley angle) and the superior "W" profile (featuring a central raised ridge that prevents water from crossing between adjacent roof planes). The opening should gradually widen toward the eave to accommodate increasing water volume.

Quality Considerations

Many contractors quote lightweight aluminum or thin-gauge metal to reduce costs. Premium installations feature heavy-gauge, pre-finished galvanized steel with "W" profiles that maintain straight valley lines and provide superior water control. When comparing estimates, significant price differences in metal valley options typically reflect these critical material distinctions.

Shingle-Covered Water Channels

Closed Valley Construction: Budget-Conscious Alternative

Installation Methodology

Closed valleys conceal the water channel beneath the primary roofing material. While still requiring a 3-foot ice and water shield foundation, these valleys eliminate exposed metal by extending shingles across the valley line. This approach reduces material costs but may compromise long-term performance in high-water-volume applications.

Design Variations

Two common closed valley styles include woven valleys (where shingles from adjacent slopes are alternately overlapped) and closed-cut valleys (where lower-slope shingles extend through the valley with upper-slope shingles cut in a straight line along the valley center). The latter ensures water from higher slopes flows onto lower-slope shingles rather than potentially infiltrating beneath them.

Performance Expectations

Many contractors overlook critical details for proper closed valley installation, leading to premature failure. While closed valleys provide cost savings, they typically represent the first area of roof breakdown due to concentrated water flow. Standard roofing materials designed for water shedding often deteriorate more quickly when subjected to the constant water channeling of valley applications.

Balancing Performance and Budget

Making an Informed
Valley Selection

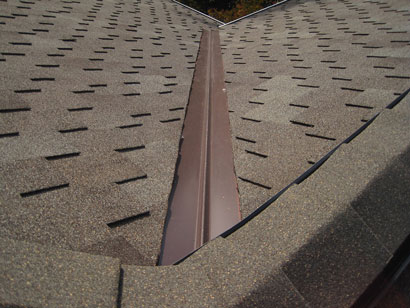
In the professional assessment of Dayus Roofing, a properly installed “W” profile open metal valley with dual ice and water shield layers represents the most durable solution available. This premium construction method typically matches the full warranty period of even the longest-lasting roofing systems.

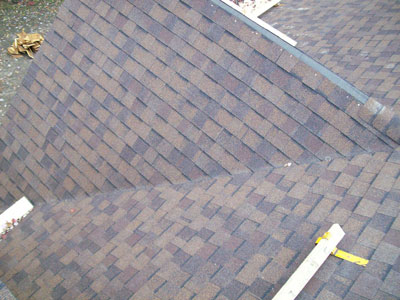
Closed-cut valleys emerged primarily as cost-saving alternatives that sacrifice some longevity for initial savings. Many premium roofing products with enhanced thickness cannot accommodate closed valley installations due to their limited flexibility and water-handling capabilities.

Understanding these critical differences helps you evaluate roofing proposals and make informed decisions about protecting these vulnerable roof areas based on your specific priorities and budget considerations.